Supplies:
- Crayola Washable Glue Sticks
- Crayola Scissors
- Crayola Glitter Glue
- Crayola Construction Paper - 22.9 cm x 30.5 cm (9" x 12") - assorted colours
- Crayola Broad Line Markers
- Pencils
- Geometric Shape Tracers
Steps:
1
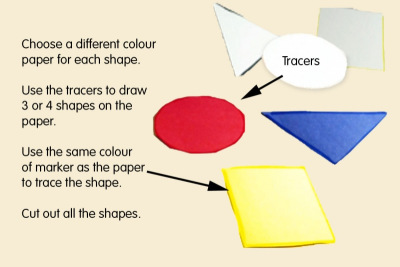
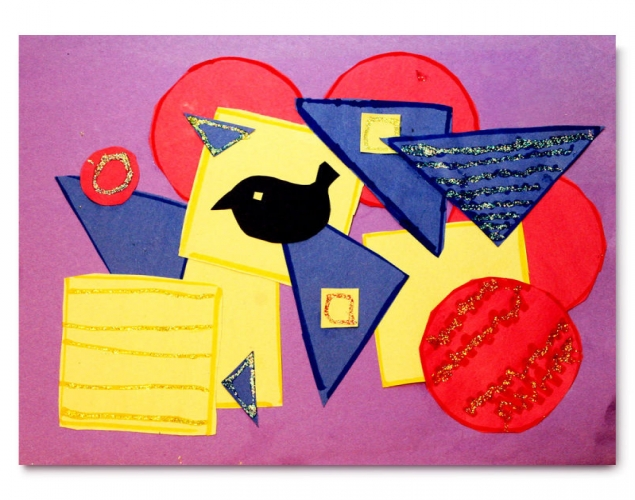
- Choose a different coloured paper for each geometric shape.
- Use the tracers to draw 3 or 4 shapes on the paper.
- Use the same colour of marker as the paper when you trace your shapes. For example, use a red marker to trace circles on red paper.
- Cut out all the shapes.
Hint: Cut a frame about 1 cm (1/2") around each shape before cutting on the lines. This makes it easier to hold and cut.
2

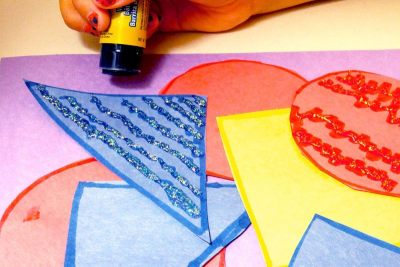
- Draw about 6 different lines on a piece of paper.
- Choose one of your lines to add detail to one of your shapes.
- Choose one of the shapes.
- Draw the line on the shape with a marker that is the same colour as the shape.
- Draw over the line with glitter glue that is the same colour as your shape.
- Repeat this process for each of the other shapes. Make sure you choose a different line for each new shape.
- Remember to use red marker on red paper, blue marker on blue paper, and yellow marker on yellow paper.
- Set the shapes aside to dry.
3
- Find a background colour that you think looks best with your shapes.
Hint: Try placing your shapes on several background colours to help you decide which one you like best. - Make sure the glitter glue is dry before you begin.
- Use all your shapes to create your design.
- Arrange the shapes so your eye moves around the paper from one space to another in an interesting way.
- Once you are happy with the way it looks glue the shapes in place.
4
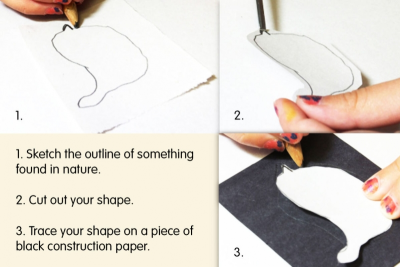
- Sketch the outline of an animal, bird or something else found in nature on a small piece of paper.
- This organic shape will be a silhouette in your collage.
- Make sure the size suits your design. - Cut out your shape to make a tracer.
- Trace your shape on a piece of black construction paper.
- Cut out the shape.
5
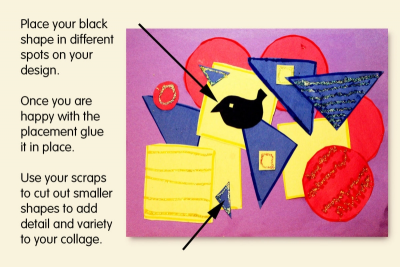
- Place your black shape - your silhouette in different spots on your design.
- Once you are happy with the location glue it in place.
- Use your scraps to cut out smaller shapes to add detail and variety to your collage.
Subjects:
Language Arts,
Mathematics,
Visual Arts
Grades:
Grade 1,
Grade 2,
Grade 3