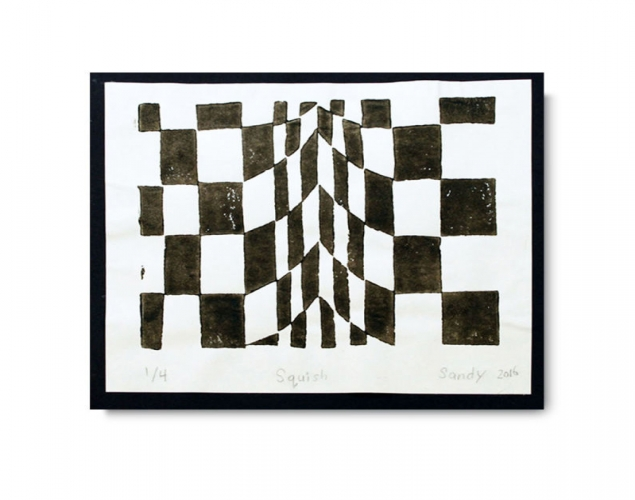
OP ART PRINTS – Using Geometry to Fool the EyeStudents use a craft foam printing plate and tempera paint to create an edition of prints in a non-objective, Op Art style.
Students use a craft foam printing plate and tempera paint to create an edition of prints in a non-objective, Op Art style.
Supplies:
- Crayola Tempera Paint
- Crayola Marker & Watercolour Paper - 22.9 cm x 30.5 cm (9" x 12")
- Crayola Scissors
- Foam Core Board - 10 cm x 12.7 cm (4" x 5") - 1 per student
- Self-Adhesive Craft Foam - 8 cm x 12 cm (3" x 4.5") - 1 per student
- Pencils
- Erasers
- Rulers
- Paint Rollers - Soft
- Plastic Trays
- Old Magazines
Steps:
1

- Trace the shape of your craft foam on a piece of drawing paper.
- Use the instruction sheet to carefully measure and draw your op art design on this rectangle. (Downloads - GRID.pdf)
- Shade in the alternating pattern.
2

- Use your plan drawing as a guide to transfer your design to the self-adhesive craft foam.
3
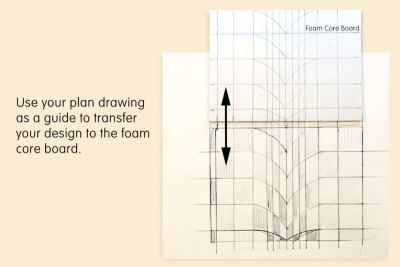
- Use your plan drawing as a guide to transfer your design to the foam core board.
4
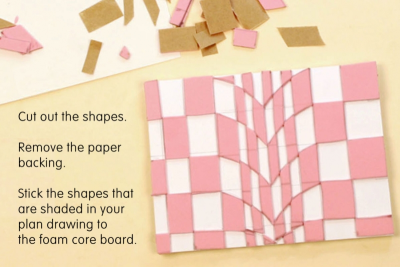
- Carefully cut out the shapes.
- Remove the paper backing and stick the shapes that are shaded in your plan drawing to the foam core board in the appropriate spots.
- This is your printing plate.
5
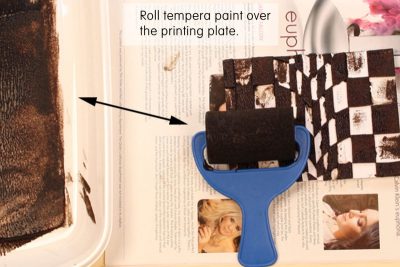
- Place the printing plate on an open magazine.
- Pour some tempera paint into a plastic tray.
- Gently roll the soft roller into the paint.
- Roll the paint over the printing plate.
- This is calledinking the plate.
6
- Gently lift the inked plate off the magazine page which probably has paint on it.
- Turn the magazine page and place the inked plate face up on the clean magazine page.
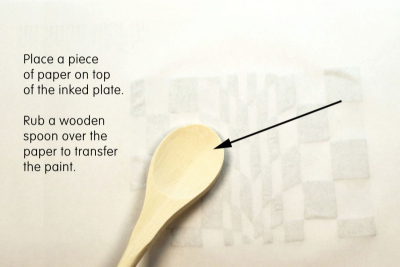
- Place a piece of paper on top of the inked plate.
- Rub a wooden spoon over the paper to transfer the paint to the paper in a smooth way.
- This is called burnishing.
7
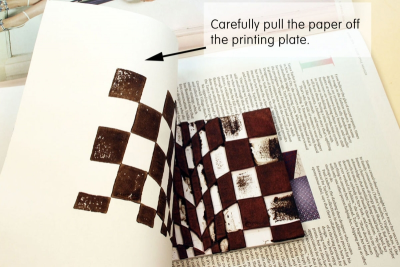
- Carefully pull the paper off the printing plate to see your print.
- This is called pulling the print.
- Place the print in a safe place to dry.
8
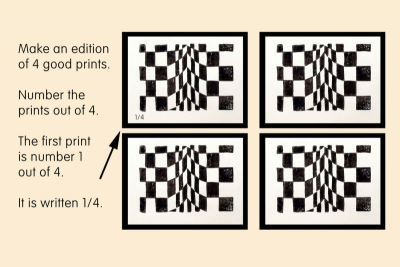
- Make an edition of 4 good prints.
- Number and sign them.
- An edition of 4 prints is numbered 1/4, 2/4, 3/4, 4/4.
- The first number shows the order the print was made - first, second etc.
- The second number shows the number of prints in the whole edition. - Signing and numbering are done in pencil at the bottom of the print.
- Usually the number is written in the lower left corner.
- The title of the print goes in the middle.
- The artist’s name in the right corner. - Mount your prints on construction paper for display.
Subjects:
Language Arts,
Mathematics,
Visual Arts
Grades:
Grade 5,
Grade 6,
Grade 7,
Grade 8,
Grade 9