Supplies:
- Crayola Coloured Pencils - 24 Count
- Crayola Fine Line Markets - Black
- Crayola Scissors
- Photographs
- Cardstock Paper
Steps:
1

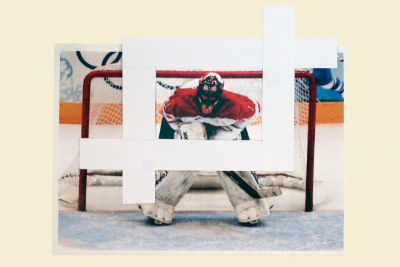
LONG SHOT
- Find a photograph that frames a figure using a long shot.
- The subject is cropped just above the head and just below the feet. - Cut out 2 L-shaped pieces of cardstock, width about 2.5 cm, to use as a viewfinder.
- Draw this image in the Long Shot space of the handout.
*Image – By kinnigurl - Luongo, CC BY-SA 2.0, https://commons.wikimedia.org/w/index.php?curid=9617943
2
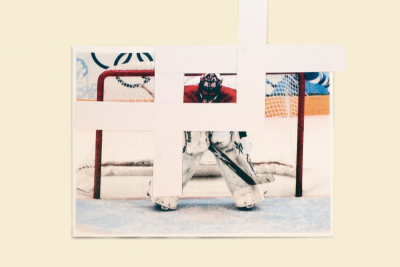
MEDIUM SHOT
- Use the viewfinder to crop the image in a medium shot.
- Make sure the frame is landscape.
- Crop the subject just above the head and just below the waist. - This shot shows part of the subject in more detail.
- Draw this image in the Medium Shot space of the handout.
*Image – By kinnigurl - Luongo, CC BY-SA 2.0, https://commons.wikimedia.org/w/index.php?curid=9617943
3
CLOSE-UP SHOT
- Use the viewfinder to crop the image in a close-up shot.
- Make sure the frame is landscape.
- Crop the subject at, or just below the top of the head and just below the shoulders. - This shot shows a specific part of the subject, usually the face, and takes up the whole frame.
- Draw this image in the Close-Up Shot space of the handout.
*Image – By kinnigurl - Luongo, CC BY-SA 2.0, https://commons.wikimedia.org/w/index.php?curid=9617943
4

EXTREME CLOSE-UP SHOT
- Use the viewfinder to crop the image in an extreme close-up shot.
- Make sure the frame is landscape.
- Crop the subject just above the eyebrows and just below the eyes. - This shot is often used to show emotion.
- Draw this image in the Extreme Close-Up Shot space of the handout.
*Image – By kinnigurl - Luongo, CC BY-SA 2.0, https://commons.wikimedia.org/w/index.php?curid=9617943
5
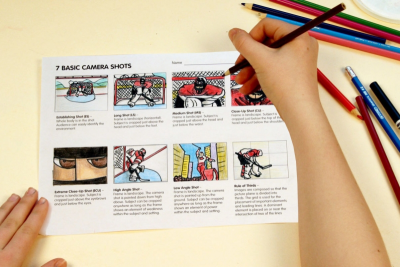
ESTABLISHING SHOT
- Use your imagination to create the establishing shot for your photograph.
- Make sure the frame is landscape.
- The whole body is in the shot and the viewer can easily identify the environment.
- A sense of the environment/location should help tell a story. - This shot sets the scene.
- Find new photographs to help you complete the remaining frames in the worksheet.
Subjects:
Language Arts,
Visual Arts,
Media Literacy
Grades:
Grade 7,
Grade 8,
Grade 9,
Grade 10,
Grade 11,
Grade 12